How to Make a Sourdough Bread Starter
Ingredients
For the Starter:
- 1 cup whole wheat flour
- 1/2 cup cool water
For Feeding the Starter:
- 1 cup unbleached all-purpose flour
- 1/2 cup cool water if your house is warm, or lukewarm water if your house is cool
Instructions
To prepare the starter on day 1:
- Combine the whole wheat flour with the cool water in a non-reactive container, such as glass, crockery, stainless steel, or food-grade plastic, with at least a 1-quart capacity.
- It is important that the container be large enough to hold the starter as it grows.
- Stir everything together thoroughly; make sure there's no dry flour anywhere; cover the container loosely and let the mixture sit at warm room temperature, around 70°F, for 24 hours.
To prepare the starter on day 2:
- You may see no activity at all in the first 24 hours, or you may see a bit of growth or bubbling. Either way, discard half the starter, about 1/2 cup, and add to the remainder a scant 1 cup unbleached all-purpose flour, and 1/2 cup cool water or, if your house is warm, lukewarm water.
- Mix well, cover, and let the mixture rest at room temperature for 24 hours.
To prepare the starter on day 3:
- By the third day, you'll likely see some activity — bubbling, a fresh, fruity aroma, and some evidence of expansion.
- It's now time to begin two feedings daily, as evenly spaced as your schedule allows.
- For each feeding, measure out a generous 1/2 cup of starter; discard any remaining starter.
- Add a scant 1 cup unbleached all-purpose flour and 1/2 cup water to the 1/2 cup starter.
- Mix the starter, flour, and water, cover, and let the mixture rest at room temperature for approximately 12 hours before repeating.
To prepare the starter on day 4:
- Measure out a generous 1/2 cup of the starter and discard any remaining starter.
- Add a scant 1 cup unbleached all-purpose flour, and 1/2 cup water to the 1/2 cup starter.
- Mix the starter, flour, and water, cover, and let the mixture rest at room temperature for approximately 12 hours before repeating.
To prepare the starter on day 5:
- Measure out a generous 1/2 cup of the starter and discard any remaining starter.
- Add a scant 1 cup unbleached all-purpose flour, and 1/2 cup water to the 1/2 cup starter.
- Mix the starter, flour, and water, cover, and let the mixture rest at room temperature for approximately 12 hours before repeating.
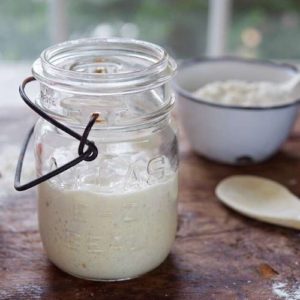
- By the end of day 5, the starter should have at least doubled in volume. You'll see lots of bubbles; there may be some little "rivulets" on the surface, full of finer bubbles. Also, the starter should have a tangy aroma — pleasingly acidic, but not overpowering.
- If your starter hasn't risen much and isn't showing lots of bubbles, repeat discarding and feeding every 12 hours on day 6, and day 7, if necessary; as long as it takes to create a risen and bubbly starter.
- Once the starter is ready, give it one last feeding.
- Discard all but a generous 1/2 cup; feed as usual.
- Let the starter rest at room temperature for 6 to 8 hours; it should be active, with bubbles breaking the surface.
- Remove however much starter you need for your recipe – typically no more than 1 cup.
- If your recipe calls for more than 1 cup of starter, give it a couple of feedings without discarding, until you've made enough for your recipe plus 1/2 cup to keep and feed again.
- Transfer the remaining 1/2 cup of starter to its permanent home: a crock, jar whatever you'd like to store it in long-term.
- Feed this reserved starter with 1 scant cup of flour and 1/2 cup water, and let it rest at room temperature for several hours, to get going, before covering it.
- If you're storing the starter in a screw-top jar, screw the top on loosely rather than airtight.
- Store this starter in the refrigerator and feed it regularly; I recommend feeding it with a scant 1 cup flour and 1/2 cup water once a week.
Notes
Discarding half the starter seems so wasteful; however, unless you discard starter at some point, eventually you’ll end up with a very large container of starter. Also, keeping the volume down offers the yeast more food to eat each time you feed it; it’s not fighting with quite so many other little yeast cells to get enough to eat.
This starter begins with whole-grain flour because the wild yeast that gives sourdough starter its life is more likely to be found in the flora- and fauna-rich environment of a whole-grain flour than in all-purpose flour.
If all you have is all-purpose flour, go ahead and use all-purpose; you may find the starter simply takes a little longer to get going. Also, if you feed your starter on a long-term basis with anything other than the all-purpose flour called for here, it will probably look thicker or thinner, have a different color and act differently. Not to say you can’t feed your starter with alternate flours; just that the results may not be what you expect.
A word of advice – conditions vary so widely that 5 days can be far too little. I’ve learned the key is to watch for a dramatic and consistent rise in the jar — at least doubling between 1 and 4 hours after feeding. This could be 5 days, or less, after you begin, or it could be 12 to 14 days, or more.